

Slewing Ring Bearing Maintenance Specific Procedures
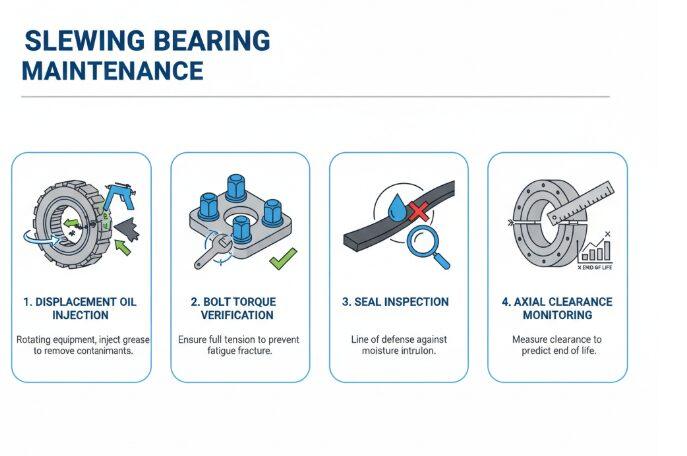
The maintenance of slewing bearings involves the following four steps:
- Displacement oil injection (grease injection to remove contaminants when rotating equipment)
- Bolt torque verification (to ensure that tension is complete to prevent fatigue fracture)
- Seal inspection (line of defense against moisture intrusion)
- Axial clearance monitoring (to predict end of life by measuring clearance)
For heavy machinery such as excavators and cranes, strict implementation of this process is the only way to ensure safety and longevity. Other than that, there is no other way.
The following are specific inspection and operation guidelines:
Lubrication
Correct oil filling posture: note while turning
This is the most overlooked detail in the field: you must rotate the bearing while filling oil (at least two full turns). If it does not rotate, the grease will only accumulate at a point near the oil injection port, and the other parts of the raceway are still in a dry grinding state.
“Purge” technology
Keep pumping the grease until you see the fresh grease squeeze out evenly from the entire circumference of the sealing lip. This step is crucial. The discharged old grease carried away metal debris, dirt and water. In my experience, if you don’t top out the old oil, you are actually turning the inside of the bearing into a cylinder “grinding paste”.
Raceway vs. Ring Gear
Don’t get confused. The inner race usually requires EP2 (extreme pressure) lithium-based grease, while the outer ring gear requires high-viscosity open gear lubricant (Open Gear Lubricant).
Mark’s field experience:
If you find that a grease nipple (Zerk fitting) can’t get into the oil, you can’t ignore it! This means that the oil channel has been blocked by the dry and hard grease. Remove the nozzle and clean the oil passage with a wire or drill. Trust me, this one blocked port alone is enough to cause the entire bearing to be scrapped.
Bolt Torque Checks
The slewing bearing bears a huge overturning moment. If the bolt is loose, the load will be transferred to the adjacent bolts, causing them to collapse like a zipper being opened, one by one.
How to check:
- New equipment: After the first 50 hours of operation, all bolts must be 100% checked.
- Routine inspection: every 250-500 hours, sampling 10% of the bolts. Note that you must check all the bolts whenever one is found to be loose.
Reject the “knock test”:
Don’t use a hammer to knock the bolt to listen to the sound to judge the degree of tightening. This soil method is completely unreliable for high-tension bolts. A calibrated torque wrench must be used.
Seal Inspection
The seal is the armor of the bearing. Once the sealing strip is torn and water and sand enter the raceway, rust will begin immediately.
What to see:
Visually inspect the rubber seal for tears or embrittlement. When doing “replacement oil injection”, if the grease is sprayed from a specific point instead of seeping evenly along the sealing ring, it means that the seal in this area has failed and needs to be replaced.
Clearance Measurement
Measuring the axial clearance (or “clearance”) is the only scientific way to determine whether the bearing is about to die.
How to perform the Tilt Test:
Park the machine on level ground. Use the boom/bucket to support the ground (slightly raise the track/tire) to maximize the negative load. Zero the magnetic dial indicator with the probe against the bearing race. Lift the bucket off the ground and apply a positive load (balance the machine). Read the dial gauge value. If the amount of movement exceeds the OEM limit (depending on the size, usually between 1.5mm and 3mm), it means that the raceway has been severely worn (shot). Make a replacement plan now.
Maintenance Strategy & Management
Standardized Maintenance Schedule
| Frequency | Critical Tasks (Checklist) |
| Daily (Every 8-10 Hours) | Lubricate Raceway: Must be done while rotating. Visual Check: Look for fresh grease leaks or detached seals. |
| Weekly | Lubricate Gears: Check open gear grease coverage. Auditory Check: Listen for grinding or clicking sounds during rotation. |
| Every 250-500 Hours | Bolt Torque: Sample check 10% of mounting bolts. Cleaning: Power wash external debris to prevent seal contamination. |
| Every 1000-2000 Hours | Clearance Check (Tilt Test): Record the play data. An increase in play over time is your trend line for failure prediction. |
| Every 2000-4000 Hours | Grease Analysis: Send a sample of used grease to a lab. High iron (Fe) counts mean raceway spalling; copper usually indicates cage wear. |
Warning Signs
- Audible grinding/popping sound: Hearing a “pop” usually means that a roller has broken.
- Action Catton: If the turning action feels “one and one” or has hard points, there is a high probability that the raceway has fatigue peeling.
- There are metal shavings in the grease: if you see glistening “gold powder” or metal flakes in the discharged waste oil, the bearing has basically begun to disintegrate.
About the Author
I’m Mark Sterling, a Senior Field Service Engineer with over 20 years of hands-on experience in heavy machinery diagnostics. I specialize in turning complex engineering standards into practical, on-site solutions for slewing ring bearing maintenance. My goal is to help you extend equipment life and avoid expensive downtime through proven preventive strategies—not just textbook theory.
