

Mini Digger Slew Ring Repair
Mini digger slew ring repair involves separating the upper structure (cab) from the undercarriage to replace the worn bearing. To successfully repair it, first confirm the failure by checking for excessive “play” (rocking movement) between the cab and tracks, not just the slew motor gearbox. The repair process requires: 1) Thoroughly cleaning and marking all hydraulic hoses passing through the center joint; 2) Unbolting the upper structure and using a hoist or heavy-duty crane to safely lift the cab; 3) Replacing the slew ring (ensuring the induction-hardened gear teeth face the correct load direction); and 4) Re-torquing all bolts to specific OEM settings using Threadlocker. While labor-intensive (8–12 hours), DIY repair can save you 2,000–4,000 in dealership labor costs, provided you have a safe lifting mechanism and a high-torque wrench.
Step 1: Confirm The Fault
Accurate diagnosis is essential before deciding to repair a slewing bearing. You have to distinguish whether the reduction box of the rotary motor is worn out or the bearing of the rotary bearing is completely broken.
Too many operators mistake the backlash of the gearbox for the rotary ring to be scrapped. In order to confirm that the slewing bearing is the culprit, you have to do a “shaking test”:
Pose: Put the bucket on the ground and use the boom to support the front track a little bit.
Observe the gap: Find a helper to stand in a safe position and stare at the interface between the cab structure and the chassis.
Shake: Gently shake the machine up and down. If you see vertical displacement or separation (i.e., excessive “open volume”), it’s not running, the bearing is indeed broken. However, if this amount is only in the direction of rotation (left and right) and there is no movement in the vertical direction, the problem is probably in the reduction box of the rotary motor, not the rotary ring itself.
Step 2: Get Hydraulic Lines And Safety Measures
The initial stage of maintenance is to fight carefully, especially to deal with the hydraulic system of the central rotary joint (Rotary Distributor).
Thoroughly clean: Before you loosen any bolts, you must use a high-pressure water gun to clean the area around the center joint. Sediment is the mortal enemy of the hydraulic system; if gravel is mixed into the pipeline during the disassembly process, it will be a catastrophic failure once it runs back.
Mark the pipeline: When you are ready to separate the upper structure, you will encounter a stack of hydraulic pipes passing through the center swing body. Take a colored label or paint pen honestly and mark each hose and its corresponding interface clearly. I strongly recommend that you take more detailed photos. Once the connection is reversed, causing the control to reverse (for example, if you push forward, the machine will reverse), it will be fatal to operate.
Step 3: Lifting The Vehicle Structure
This is the most physical and risky part of the maintenance of the slewing bearing of the mini excavator. The cab is separated from the chassis and has extremely high requirements for the “safe lifting mechanism.”

Remove the bolt: After the hydraulic pipeline is blocked and disconnected, remove the mounting bolt connecting the slewing bearing and the chassis.
Lifting: You can’t lift this thing by manpower. You’ll have to use a heavy hoist, a gantry crane, or find another strong excavator to help. Hang the chain or heavy lifting belt on the lifting point of the cab.
Safety first: Ensure that the chassis has been padded, fixed dead. Lift slowly until the car is completely free of the center joint, and then place it firmly on the heavy bracket or railway sleeper. Never work under a suspended load, life is your own.
Step 4: Install A New Slewing Bearing
Since the machine is separated, remove the old bearing and clean the mating surface. Installing new parts is a delicate job.
Gear orientation: As I emphasized at the beginning, it is necessary to ensure that the tooth surface of the induction hardened gear faces the correct load direction. Most slewing bearings have a “soft zone” (Soft Spot, the unquenched area of the steel ball when manufactured), usually marked with an “S” or a plug. This point must be placed in the “minimum load area”—according to experience, it is usually 90 degrees away from the boom, because the boom is under the greatest stress and cannot be hit hard.
Surface treatment: The mounting surface of the chassis and cab must be absolutely clean, no old grease or rust, and the new ring must be guaranteed to fit smoothly.
Single Row Ball Slewing Bearing
Single-row ball slewing bearings are divided into internal tooth, external tooth and toothless structure, which are suitable for a variety of transmission needs.
Double Row Ball Slewing Bearing
Double-row ball slewing bearings are specially designed for super-heavy load scenarios.
Slewing Bearing With External Gear
The external gear internal flange slewing bearing integrates the advantages of external gear transmission and internal flange mounting.
Slewing Bearing With Internal Gear
The internal tooth and external flange slewing bearing is characterized by the combination of internal tooth transmission.
Slewing Bearing Without Gear
Gearless double flange slewing bearing is light weight and compact.
Cross Roller Slewing Bearing
Single-row cross roller slewing bearing adopts roller cross layout, large contact area, can synchronously and efficiently withstand axial and radial loads and overturning moment,
Step 5: Secondary Torque Tightening And Final Assembly
How long you can use this excavator after it is repaired depends entirely on how you finally fasten these new parts.
Use Thread Locking Agent: All mounting bolts should be coated with a high-strength thread locking agent. This will prevent the bolts from coming loose due to long term vibration.
Torque specification: Don’t believe in “hand tightening”. You must use a calibrated high-torque wrench to torque strictly according to your model’s OEM settings.
Tightening sequence: Do not twist in a circle. Use a star or cross pattern like changing a car tire. This can ensure that the bearing force is uniform, to prevent the rotation ring to pull deformation.
Cost Accounting: Do It Yourself Vs. Find A Dealer
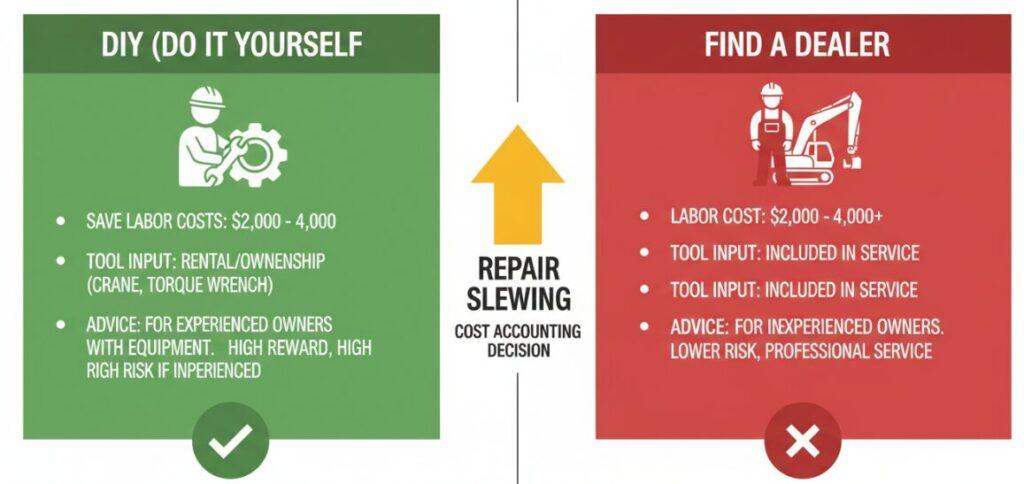
Repairing slewing bearings is indeed a time-consuming and labor-intensive project, but the return on the book is also real.
Save labor costs: Find a dealer or a professional heavy equipment technician, that labor cost is not low. Since the work is labor-intensive—it usually takes 8 to 12 hours—you can probably save 2,000 to 4,000 on labor costs alone.
Tool input: If you already have, or can rent the necessary lifting equipment and torque wrench, the money saved is net profit.
Advice: For those old car owners who have guys in their hands and know the business, the money-saving value of this trouble is absolute. However, if you don’t even have a decent spreader or lack experience in mechanical maintenance, forget it. The risk of damaging the machine or hurting yourself is far greater than saving that money.
Author:Mark Harrison
“Hi, I’m a heavy equipment specialist with over 16 years of experience in excavator maintenance. I specialize in complex structural repairs, from diagnosing hydraulic center joints to executing precision slew ring replacements. I wrote this guide to help experienced owners safely handle the heavy lifting and precise torquing required to fix their mini diggers, helping you ensure OEM standards while saving thousands in dealership labor costs.”
