

Excavator Swing Bearing Seal Replacement
Replacing the outer seal of an excavator’s swing bearing can be broken down into five distinct stages: preparation, disassembly, cleaning, installation, and finishing. Specifically, this is the process: Preparation and safety inspection: first find a flat ground to stop the machine, pad it with sleepers, and then disconnect the battery. Tools and new oil seals have to be prepared in advance. Don’t find anything missing in the middle of the work. Remove the old oil seal: carefully pry the old oil seal out with a tool. There is a key point here. It is very important to remember the orientation of the oil seal lip. Clean the installation tank (top priority): clean the groove with a scraper and solvent to absolute dryness, oil-free and dust-free. Install a new oil seal: Make sure that the lip orientation of the new oil seal is consistent with the old one. Press the oil seal in smoothly. If the oil seal has a joint, use a suitable glue (such as cyanoacrylate quick-drying glue) to firmly stick the two ends together. Concluding and inspection: install the pressure plate back and tighten the bolts according to the specified torque. Finally, slow rotation test to see if there is any abnormality.
Stage 1: Preparation And Safety
The first thing is to make the machine stable. The excavator must be parked on a solid, level ground to prevent any accidental shaking or displacement during maintenance. After the car is stopped, the working device (that is, the big arm, small arm and bucket) is completely lowered to the ground, and then flameout. The most critical step is to disconnect the negative pole of the battery and completely eliminate any possibility of accidental startup of the machine.
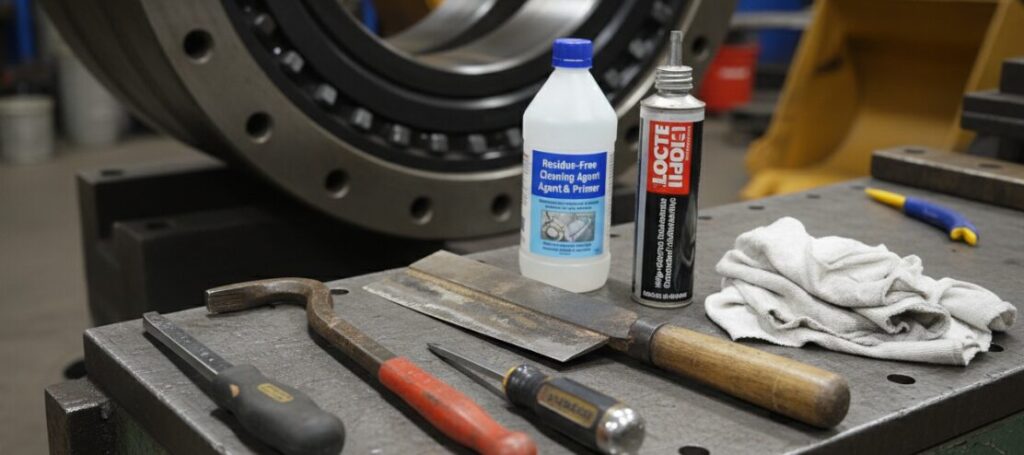
After the machine is fixed, you can start counting tools and materials. Generally speaking, for this job, you have to have these things on hand:
- Allen wrench
- Crowbar
- Flat head screwdriver
- A good scraper
- Clean, lint-free rag
- Special, residue-free cleaning agent or primer
- High-strength adhesives, such as Loctite’s quick-drying adhesives or other special structural adhesives
- A new oil seal that exactly matches the machine model.
Before you start work, I strongly suggest that you check the part number of the oil seal again and again. If you take the wrong model, it will be in vain.
Stage 2: Disassembly Of The Old Seal
The preparations are ready and we begin to dismantle. First, find the cover plate or pressure plate that protects the oil seal of the slewing bearing and remove it. In this way, the installation groove of the oil seal is completely exposed.
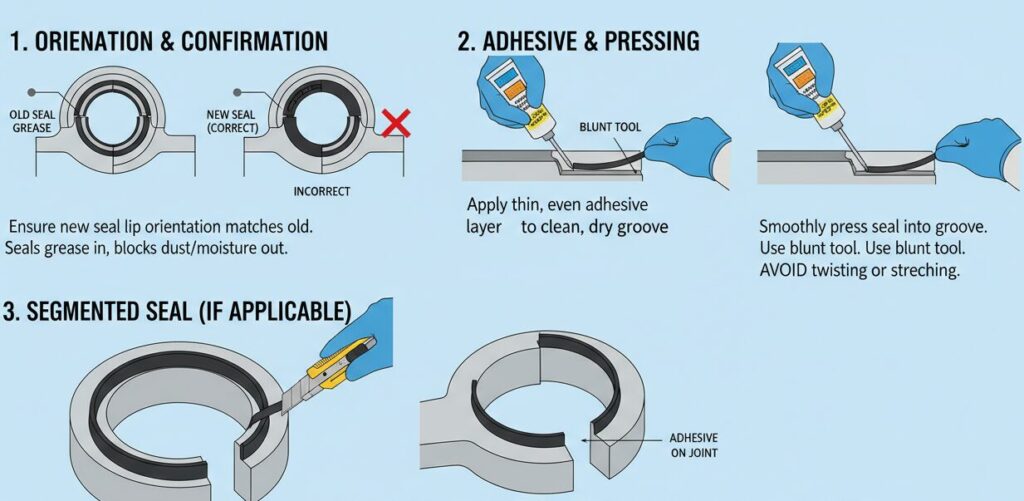
Next, carefully pry the old oil seal out of the groove with a flat-head screwdriver or a special tool for removing the oil seal. When prying, be sure to pay attention to the installation direction of the oil seal, especially the direction of its lip (usually toward the inside of the bearing, that is, the side with butter). This detail determines the success or failure of the new oil seal installation. If you can’t remember it, the new oil seal is reversed and not installed.
Be patient throughout the process and do not use brute force to avoid scratching or damaging the metal surface of the groove. Once there are scratches, the sealing effect of the new oil seal will be greatly reduced. After the oil seal is taken out, clean up the large pieces of old glue residue first.
Stage 3: Thoroughly Cleaning The Groove
The next step, let me say, is the most critical part of the whole work. The bonding quality of the new oil seal and its service life depend entirely on how clean the surface of the groove is treated.
First, use a spatula to carefully scrape all the visible old glue and hardened oil in the groove. Then, take a clean cloth, dip it in the recommended cleaning agent, and wipe the inner wall of the oil seal groove repeatedly, and wipe it several times until no stains can be seen on the cloth.
The final standard to be achieved is that the surface must be completely dust-free, oil-free and water-free. It is best to wipe it times with a brand new dry cloth to ensure that the groove is in a perfect “standby” state, ready for new glue and oil seals.
Stage 4: Installation Of The New Seal
Before installation, reconfirm that the lip orientation of the new oil seal must be consistent with the old one you removed. This orientation ensures that it effectively seals the grease in the bearing while blocking external dust and moisture.
After confirming that it is correct, apply a thin and uniform layer of adhesive to a clean and dry groove. Then, starting from a certain point, the new oil seal is pressed smoothly and firmly into the groove. You can use a blunt object or the flat end of a screwdriver to gently push it into place, taking care not to twist, stretch or break the oil seal.
If you are using the kind of segmented oil seal, first press it into the groove, and then cut off the excess length to ensure that the interface is flush. Finally, the two ends of the oil seal are coated with adhesive so that they are firmly bonded together in the groove.
Stage 5: Finishing And Inspection
After the new oil seal is completely in place, walk circles along it with your fingers to feel whether it is installed flat and flush with the surface of the rotary table. By the way, wipe off the excess glue that may be squeezed out during installation.
Next is a very important but easily overlooked link: waiting for the glue to cure. The adhesive manufacturer’s instructions must be strictly followed, and this curing period may take up to 24 hours. I know that many people are impatient and want to get the equipment back to work quickly, but the glue is not dry. If you move, all the work in front of you may be in vain. Never operate the machine during this period.
After the glue is completely cured, the protective cover plate removed before can be reinstalled. Before the excavator officially resumes full work, start the machine first, rotate the upper body slowly, and at the same time listen and watch carefully to confirm that there is no abnormal situation, and the whole replacement work will be considered a complete success.
Author: Justin
With over a decade of hands-on experience as a heavy machinery technician, I’ve spent countless hours in the workshop and out in the field. I specialize in the intricate maintenance of hydraulic and mechanical systems. I’ve learned that a successful repair, like replacing a swing bearing seal, comes down to a meticulous, step-by-step process. I hope to share this practical, field-tested knowledge to help other technicians and operators perform crucial maintenance tasks safely and effectively, ensuring the longevity and reliability of their equipment.
