
Excavator Swing Bearing Seal Replacement
Replacement of excavator slewing ring seals means you need to do a lot of disassembly-the big arm, the 2 arm, the swing motor all have to be removed to access the bearing. Next, the sealing groove must be carefully cleaned, a new sealing strip must be installed (usually butt bonding), and finally reassembled to ensure that the torque and centering are correct.
This video explains how to replace the seal on an excavator’s swing bearing seal:
Why Do Seals Have To Be Replaced Correctly?
Slewing bearing is the heart of the excavator rotating action. Once the seal fails, contaminants will invade the raceway and grease will leak out, which will cause rapid wear on the gears and bearing surfaces.
Many times, the correct implementation of the excavator slewing bearing seal replacement is the key to extend the life of the machine. Below I talk about in detail from the dismantling to the new sealing strip precision bonding of the specific steps, which are to restore the integrity of the machine.
Step 1: Safety And Preparedness
Before moving the wrench, the site and the machine must be locked. Because this process involves the separation of the upper and lower frames, stability is a hard indicator that is not negotiable.
Site selection: the excavator parked on a solid, flat ground. Do not stop at the slope or potholes, otherwise once the upper structure of the large bolt loosened, the chassis is easy to shift.
Locking the machine: use wheel blocks to fix the track or wheels to prevent any accidental rolling.
System pressure relief: completely disconnect and release hydraulic system pressure. You certainly don’t want to be sprayed with high pressure oil when you dismantle the tubing.
Weight reduction: Remove heavy-duty tools such as buckets and booms. After removing these weights, it will be much easier to fix the superstructure, which is essential for the subsequent disassembly of the swing motor.

Step 2: The Dismantling Of The Rotary System
To access the seal, a large number of components must be removed. This is the most energy-consuming part of the entire excavator slewing bearing seal replacement.
Remove the swing motor: Disconnect and remove the swing motor. In this step you will see the inner ring gear of the pinion and bearing.
Remove Interfering Parts: Remove all hydraulic lines or guards that prevent contact with the bearing bolts.
Loosen the bearing bolts: orderly remove the bolts connecting the slewing bearing with the chassis and the upper structure. This step is to be able to lift the superstructure (or the bearing itself, depending on the machine design) to make room for the disposal of the seal groove.
Step 3: Remove Old Seals And Clean Notches
How long the new seal can last depends entirely on the state of the “groove” in which it is located.
Remove the old seal: use a flat tool to pry the old rubber seal out of the groove. Extra care must be taken here to never damage the sealing surface of the bearing. Once a scratch or groove is left here, it will be a permanent oil leakage channel.
Deep cleaning: Thoroughly clean the seal groove and all surrounding surfaces. All old grease, dirt and debris must be removed. If any particles remain, the glue bonding effect of the new seal will be greatly reduced.
Single Row Ball Slewing Bearing
Single-row ball slewing bearings are divided into internal tooth, external tooth and toothless structure, which are suitable for a variety of transmission needs.
Double Row Ball Slewing Bearing
Double-row ball slewing bearings are specially designed for super-heavy load scenarios.
Slewing Bearing With External Gear
The external gear internal flange slewing bearing integrates the advantages of external gear transmission and internal flange mounting.
Slewing Bearing With Internal Gear
The internal tooth and external flange slewing bearing is characterized by the combination of internal tooth transmission.
Slewing Bearing Without Gear
Gearless double flange slewing bearing is light weight and compact.
Cross Roller Slewing Bearing
Single-row cross roller slewing bearing adopts roller cross layout, large contact area, can synchronously and efficiently withstand axial and radial loads and overturning moment,
Step 4: Install New Seal
This is the highest technical step in the entire replacement process, and precision must be paid attention.
Measuring and Cutting: New seals are usually whole rubber bands. You need to cut it to the correct length according to the bearing diameter.
Oblique cut (key point): When cutting both ends of the sealing strip, make an inclined cut (angled cut). That oblique cuts increase the contact area of the glue and are much stronger than vertical cuts.
Bonding: Apply a suitable adhesive (e. g. 502 glue) to both ends of the miter cut. Press firmly until the glue is completely cured. The interface must be seamless.
Installation: After the sealing ring is glued into a ring, stretch it slightly. This tension helps it to fit flat in the groove. Press it into the groove, making sure there are no twists or bulges.
Step 5: Reassembly And Torque Specification
After the new seal is in place, the focus of the reorganization is “alignment” and “mechanical integrity”.
Alignment “Soft Point”: Most bearings have marked “soft belt” areas (I. e., areas of the raceway that are not quenched, usually ball-loading ports). When installing the bearing, this mark must be aligned according to the manufacturer’s specifications to avoid stress concentration areas.
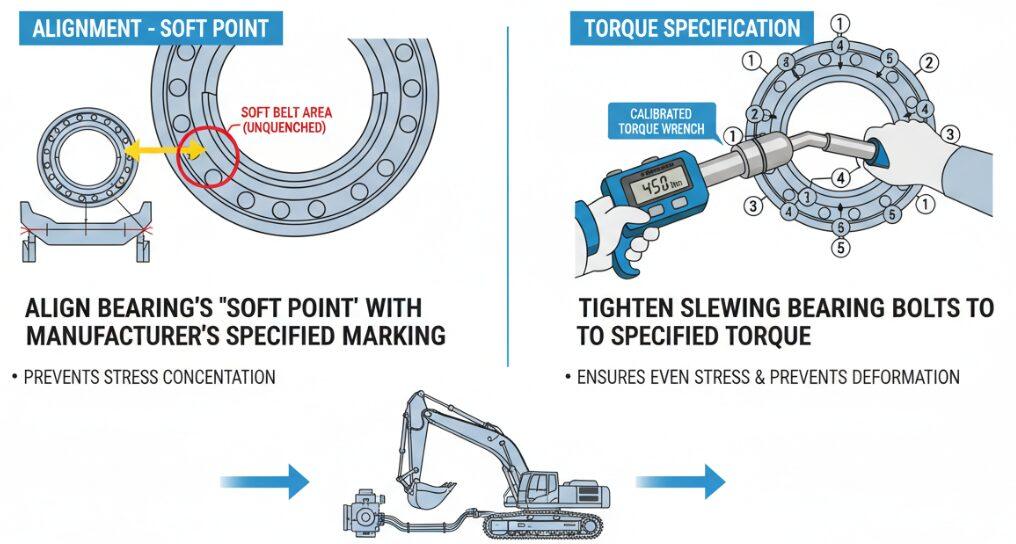
Torque: Reinstall the slewing bearing bolt. Tighten to the specified torque value using a calibrated torque wrench. This ensures that the bearing is evenly stressed and prevents deformation.
Reassembly components: reassemble the rotary motor, connect all hydraulic pipelines, and reassemble the big arm and 2 arm removed in the preparation stage.
Step 6: Swing Function Test
The last step is to verify whether the excavator slewing bearing seal replacement is successful.
Hydraulic Reconnecting: Reconnecting all hydraulic systems, and checking the hydraulic fluid levels.
Operational test: Start the machine and test the slewing function. Rotate the superstructure 360 degrees in both directions.
Leak check: Carefully inspect the bearing area for signs of grease or oil leakage. If the operation is smooth, no abnormal noise and no oil leakage, congratulations, the work is very good.
Author: John Carter
“With over 18 years of hands-on experience as a certified heavy equipment mechanic, I’ve spent countless hours in the workshop and in the field. I’ve personally handled dozens of excavator swing bearing seal replacements, and I understand that success lies in the details—like getting that angled seal cut just right. “
